Publishing
Learn how to publish your documentation on our website!
Developer portal
You can access our developer portal by clicking the Open Dashboard button on the home
page or the Developers link in the footer.
First login
If this is your first time signing in, you’ll be redirected to the login page where you can sign in using your GitHub account.
GitHub will ask you to authorize our GitHub App to access your account. It only requires minimal permissions used to verify your identify and repository access permissions. Upon approving the request, you’ll be automatically taken to the developer portal.
Ownership verification
Make sure your platform projects’ URLs are set to the repository address at the time of registration for ownership verification to succeed.
The Wiki uses a simple ownership check process to authorize project creation. This is conducted in 2 steps at the time of adding the project or later when updating project settings:
-
Matching the platform projects’ (CurseForge/Modrinth) source URLs with the Wiki project’s repository URL
-
Matching the username of the GitHub account you used to log in with the
ownersarray in the Wiki project’s metadata
Where to set the source code URL
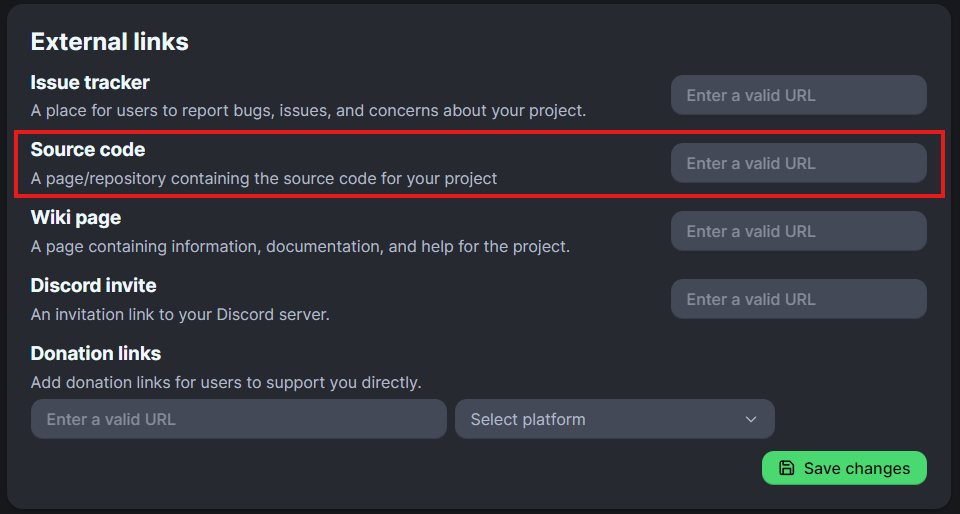
Expand to get assistance for Modrinth projects
- Open to your project’s settings.
- Navigate to the
Linkstab. - Enter the repository url in the
Source codefield. - Apply the changes.
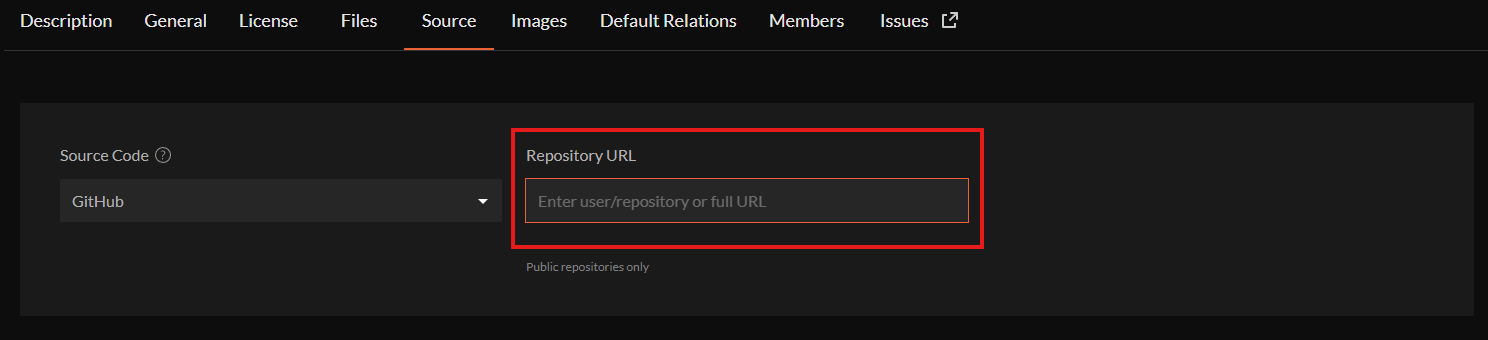
Expand to get assistance for CurseForge projects
- Open your project’s settings.
- Navigate to the
Sourcetab. - Enter the repository url in the
Repository URLfield. - Apply the changes.
Registering projects
To create a new project on the wiki, hit the New Project button. This will open a modal dialog, where you’ll be asked
to fill out the following information:
-
Repository URL- The web address you use to clone your repository. Note that it not contain the
.gitextension. - Example:
https://github.com/exampleuser/Examplemod
- The web address you use to clone your repository. Note that it not contain the
-
Branch- Default branch to fetch Wiki project information from. You can specify additional branches to load in your Wiki metadata file.
- Example:
master
-
Path to documentation root- Path to the documentation root folder inside the repository. Should begin with a leading
/. - Example:
/docs
- Path to the documentation root folder inside the repository. Should begin with a leading
Once you’ve filled everything out, hit the Submit button to complete the registration process.
Troubleshooting
If you change your default branch on GitHub (e.g. as when porting your project to newer versions), don’t forget to update the source branch in the wiki project’s settings as well, so that the website can keep showing the latest docs version.
Below you can find a list of common issues that may occur when you register your project. If your issue does appear in the list, please tell us about your problem on Discord .
Failed to verify project ownership
-
Possible cause: Your hosting platform project does not provide a Source Code link pointing to your repository.
-
Fix: For the purposes of verifying project ownership, please momentarily set the Source Code url of your project to match the repository url. See Ownership verification for details.
User is not authorized to register this project
-
Possible cause: The username of the Wiki account trying to register this project does not match any usernames in the project metadata’s
ownersfield. -
Fix: Make sure you are logged in using the correct account, or include your current username in
owners.
Repository is private
-
Possible cause: Your repository is private or otherwise requires authentication to access.
-
Fix: Please include credentials in the repository URL with sufficient permissions to clone the repository. The credentials format for HTTP URLs is as follows:
https://username:password@domain.com.
Repository exceeds maximum allowed size
-
Cause: Your repository size exceeds the maximum limit of 500 MB.
-
Fix: Consider moving your documentation into a standalone repository or try to bring its size under the limit.
Invalid path provided
The provided path does not exist or is a regular file. Please make sure the path points to an existing directory within the repository. There is no need to prefix the path with a branch or tag name.
Project management
When your project registration succeeds, you’ll be redirected to the project management dashboard and a new deployment will be created automatically.
See the Project management to learn about the project dashboard panel.